Cold feet at a gas stop can ruin a good ride fast. If you're asking how to waterproof riding boots, the real answer is not just spraying them once and hoping for the best. It takes the right treatment for the boot material, solid prep, and a little upkeep if you want dry feet when the weather turns ugly.
How to Waterproof Riding Boots Without Wrecking Them
Not every riding boot should be treated the same way. That is where riders mess it up. A full-grain leather touring boot, a suede casual riding boot, and a textile adventure boot all handle waterproofing differently, and using the wrong product can stain the finish, clog breathability, or weaken the material over time.
Before you put anything on your boots, check what they are made from. Smooth leather usually does best with waxes, creams, or leather-specific waterproofing sprays. Suede and nubuck need a spray made for those finishes, because wax will flatten the texture and leave them looking rough in all the wrong ways. Textile and synthetic boots usually respond best to fabric-safe sprays that coat the outer layer without making the boot stiff.
If your boots already have a built-in waterproof membrane, that helps, but it does not mean the outside is maintenance-free. The membrane can keep water from reaching your socks, but if the outer shell gets soaked, the boots feel heavy, dry slower, and get colder on the road. Treating the exterior still matters.
Start With a Clean Boot
Waterproofing dirty boots is a waste of product. Mud, road salt, and old grime block the treatment from bonding to the surface, and that leaves weak spots where water gets in first.
Brush off loose dirt with a soft brush or cloth. If the boots are caked with mud, use lukewarm water and a mild cleaner made for the material. Skip harsh soaps, bleach, or household cleaners. They can strip oils from leather and break down glues and finishes.
Let the boots dry naturally before you apply anything. Do not throw them next to a heater, on a vent, or under direct high heat. That can crack leather, warp parts of the boot, and shorten its life. Stuffing them lightly with paper helps them hold shape and pull out moisture while they dry.
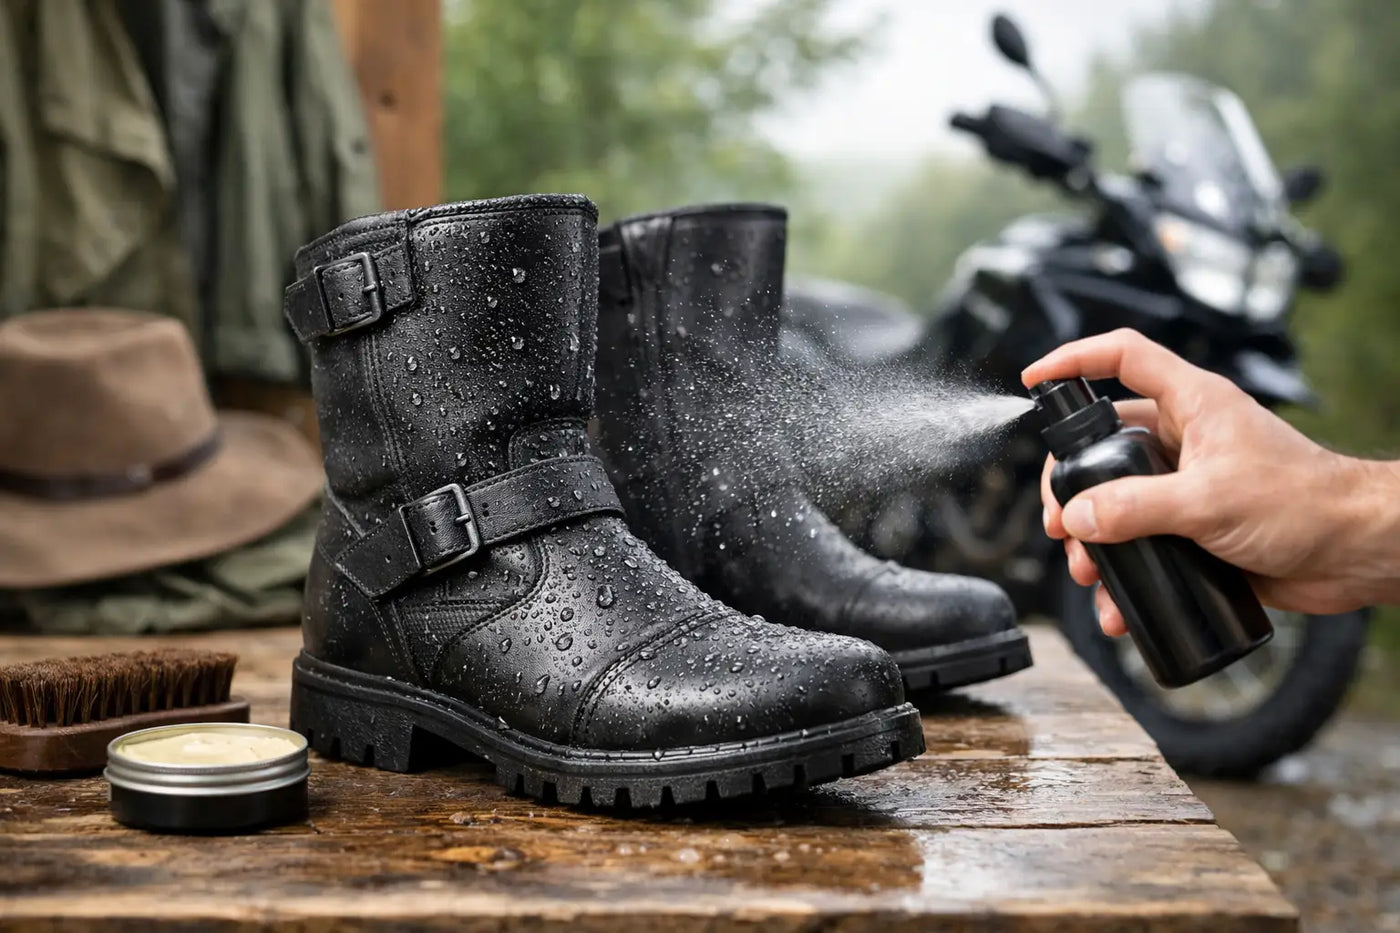
Pick the Right Waterproofing Product
This is where the job gets won or lost. If you want to know how to waterproof riding boots properly, match the product to the boot.
For smooth leather, wax is a favorite for riders who want strong water resistance and added protection against road grime. It works especially well for work-style riding boots and touring boots that see real weather. The trade-off is breathability. Heavy wax can make boots feel warmer and less able to vent on hot rides.
Creams and conditioners with waterproofing properties are a good middle ground. They help maintain leather, reduce drying and cracking, and add moderate water resistance. They usually will not hold up as long in heavy rain as a dedicated wax, but they are easier on the leather's look and feel.
For suede, nubuck, and textile boots, use a waterproofing spray built for those materials. These sprays create a barrier without crushing texture or leaving a greasy finish. They are convenient, but they usually need more frequent reapplication than wax.
Silicone-based sprays can work well on some boots, but they are not always ideal for every material. On certain leathers, they can affect breathability or alter the finish. When in doubt, use a product made specifically for motorcycle boots or at least for the exact material in front of you.
How to Apply Waterproofing the Right Way
Take out the laces if your boots have them. Open the boot up as much as you can so you can reach the tongue, seams, and flex points. Those areas are common leak zones.
If you are using wax or cream, apply a thin, even layer with a clean cloth or applicator. Work it into seams, stitch lines, and around the toe box and ankle flex areas. Those take the most abuse from water and road spray. Do not cake it on. Too much product can leave buildup, attract dirt, and stop the boot from breathing.
If you are using a spray, hold the can at the distance listed on the label and coat the boot evenly. Light, repeated passes usually work better than soaking one section until it drips. Pay attention to seams and the lower portion of the boot where water hits hardest.
Most products need time to cure. That means letting the boots sit and dry fully before you ride in them. Some waxes also benefit from a little gentle warmth from your hands or a warm room so they absorb better, but again, skip direct heat. Fast drying is not the goal. Proper bonding is.
For leather boots, buffing after treatment can help restore a cleaner finish. For suede and nubuck, a soft brush can lift the texture back up once the product has dried.
The Spots Riders Forget
A lot of riders treat the big visible panels and call it done. Then they hit rain and wonder why water still gets in.
Seams are the biggest weak point. So are the tongue, zipper area, and welt where the upper meets the sole. If your boots have a side zipper, that zipper is not automatically waterproof just because the boot is. Some boots use storm flaps or gussets to help, but many still need extra attention in wet conditions.
The sole matters too. If the tread or sole edge is separating, no spray or wax will fix that. Waterproofing products are not repair products. Once a boot is structurally failing, water finds a way in. At that point, repair or replacement makes more sense than another coat of treatment.
How Often Should You Reapply?
It depends on how you ride. If your boots see occasional fair-weather use, you may only need to refresh them every couple of months. If you ride in all conditions, deal with regular highway spray, or clean your boots often, reapply more frequently.
A simple test works. Sprinkle a little water on the boot. If it beads up and rolls off, the treatment is still doing its job. If the water darkens the material and starts soaking in, it is time for another round.
Rain, heat, dust, and flex all wear down waterproofing. So does everyday abrasion from shifting, walking, and road grime. There is no one-and-done treatment that lasts forever.
Waterproofing Helps, But It Has Limits
This is the part worth saying straight. Waterproofing your boots does not turn every pair into a deep-rain touring boot. If the boot has poor construction, exposed openings, cheap stitching, or no weather-minded design, treatment only gets you so far.
That matters if you ride long distance, commute in storms, or spend real time in bad weather. A solid waterproof treatment can seriously improve performance, but it cannot fully replace a well-built waterproof boot with sealed construction and a proper membrane.
The upside is that even a basic treatment still helps. Your boots resist saturation better, clean up easier, and hold up longer against the daily grind. For riders who want more from their gear without replacing it right away, that is money well spent.
Storage and Maintenance Matter Too
Once your boots are waterproofed, keep them that way. Dry them out after wet rides. Clean off salt, mud, and road film before it builds up. Store them in a cool, dry place where air can circulate.
Do not leave soaked boots stuffed in a saddlebag or tossed in the trunk for days. That leads to odor, material breakdown, and leather that starts feeling like cardboard. A little maintenance beats replacing gear early.
If you run multiple pairs, rotate them. Giving boots time to dry fully between rides helps preserve both the waterproofing treatment and the boot itself. Riders who wear the same pair every day in every condition tend to burn through them faster.
At American Legend Rider, that road-ready mindset is the whole point - gear should work hard, hold up, and look right doing it.
A good pair of boots takes a beating from rain, road grime, and long miles. Treat them right, reapply when needed, and your next wet ride is a whole lot less miserable.


No comments yet. Be the first rider to weigh in.